My New Computer Setup

After my last blog post, I finally bought my first Framework Laptop and set it up. Now, I'd like to share that journey with you.

The Framework Laptop

I opted for the Framework 13 Laptop because I love the concept of a modular and repairable machine. I don't plan on buying a new laptop for several years; what I really need are upgrades for the CPU and possibly the RAM. I chose the AMD version because I’m not a fan of E-P cores. I've never used an AMD CPU before. I had some idea how to use my computer and I didn't how E-P cores would work. But I didn't spend too much time comparing CPUs, as I believe either one would suffice.

When the package arrived, it came in different parts. The CPU was already installed on the motherboard, so all I had to do was to insert the RAM and disk, and follow the instructions to connect and cover the monitor and keyboard. It was straightforward and simple. I did encounter an issue with the monitor. That was a quality issue. But customer service replaced it quickly.

Although I like FreeBSD, I decided against using it because:

  1. It failed to boot from the installation.

  2. I wanted something that worked out of the box, with minimal time spent fixing issues.

  3. I planned to virtualize my daily OS.

Virtualizing All the Systems

I envisioned using both a stable OS and an up-to-date OS. I didn't want an update to crash the system and force me to spend time fixing it. At the same time, I wanted to keep my system current. So, I decided to virtualize my setup.

I set up a VM host to be as simple and stable as possible, leaving it unchanged for long time. Meanwhile, I keep my VMs up to date. If a VM becomes irrecoverable, I can simply create a new one. In contrast, if the host system breaks due to an update, I can reinstall it and continue using the VMs.

This approach also allows smooth migration to different Linux distributions. I can reuse the same home directory and start a new VM with a different distro, though I haven't done that yet.

The data and home directory are stored on the host file system and shared with the VM. The VM gets as much CPU and memory as possible, and most USB devices are attached to the VM.

Linux Host

FreeBSD wasn't an option, as I mentioned earlier—it wouldn't boot. Additionally, I couldn't attach individual USB devices to the bhyve guest, and passing through the whole PCI would include too many devices needed by the host. KVM supports attaching USB devices, which is crucial for my usage.

I started with OpenSUSE as the host for a while, but it caused the system to overheat and shut down when using VMs. I tried various power management tools but couldn't resolve the issue.

Eventually, I chose Gentoo as the host and set up a minimal desktop environment using LXQt as the desktop environment. I chose Gentoo for its customization options and my familiarity with it. LXQt was selected for its lightweight nature and ease of managing my two external monitors. There are lighter window managers. But they don't come with detection of external monitors automatically.

Linux Guest

I use OpenSUSE as the guest OS for my daily tasks. It starts automatically when I log into the host, and I set up virt-viewer on start as well. So I would be able to start using the VM when I log in to the host.

I attempted to install FreeBSD as a guest but failed. I haven't investigated the issue yet, so I continue using OpenSUSE.

Using KDE and its GUI tools has made my workflow more productive compared to the terminal-heavy approach I used before.

Setup of the Host and Guest

I also set up a Windows VM, which complicates the overall setup. I must carefully allocate (maximum) memory for both the Linux and Windows VMs to avoid using swap, which causes noticeable audio/video choppiness. I aim to assign as much CPU and memory as possible to the Linux VM, with just enough for the Windows VM. So far, both run smoothly together.

I created a shared folder on the host, accessible to the Linux VM via virtio file system. However, I encountered some issues:

  1. The virtio file system consumes memory, adding pressure on the system and increasing the possibility of swap usage.

  2. Files added to the shared folder from the host aren't immediately visible in Dolphin on the guest VM without restarting Dolphin, although they are visible via the terminal.

Initially, video playback in the Linux VM was slow. I discovered it was because I hadn't enabled OpenGL for graphics. I enabled OpenGL using virtio video, and now I could play videos smoothly. The only drawback is that I can only enable OpenGL on one VM at a time.

I use a Unix socket for SPICE and PipeWire for audio, to reduce the latency. Below is my setting for video and audio.

<video>
  <model type='virtio' heads='2' primary='yes'>
    <acceleration accel3d='yes'/>
  </model>
  <address type='pci' domain='0x0000' bus='0x00' slot='0x01' function='0x0'/>
</video>

<audio id='1' type='pipewire' runtimeDir='/run/user/1000'>
  <input mixingEngine='yes' fixedSettings='no' name='suse' streamName='suse'/>
  <output mixingEngine='yes' fixedSettings='no' name='suse' streamName='suse'/>
</audio>

<graphics type='spice' defaultMode='insecure'>
  <listen type='socket' socket='/tmp/spice-suse.socket'/>
  <image compression='off'/>
  <gl enable='yes' rendernode='/dev/dri/by-path/pci-0000:c1:00.0-render'/>
</graphics>

One thing I missed is that I couldn't enable hibernation on the guest. Though there is an option to enable sleep to ram and sleep to disk, I'm surprised that it's only supported when the VM is set up for BIOS. If the VM is set up for UEFI, those options become invalid options.

I've been using it for about one year. So far the laptop and the setting are quite good.

My Short Experience Using FreeBSD

FreeBSD is a less known and less common operating system amonst regular users. But it exists for a long time. Unfortantely, it is mainly used as a
server and doesn't focus on desktop environment as much. That doesn't mean it won't work as a desktop. About seven months ago, I switched
from Gentoo to FreeBSD as my daily desktop. And I have mixed feeling about that.

It is pretty smooth to install it. I won't repeat how to do it. The handbook includes everything you need to install and how to set up the desktop environment. Everything, including X11, works out of box. The handbook is all I need to get FreeBSD running.

There are two ways of installing applications. First, install pre-built binaries from FreeBSD repository. Second, build it locally and install it. I've been using Gentoo many years. So I don't hesitate to build all the applications.

An illustration about choosing between building or downloading applications

There are a few things I hope we can improve the experience of building the application.

First, the hamdbook doesn't mention where the options of the packages are. When I build some applications, it prompts me about the options for the application. How is it possible to do it on multiple machines or even after I reinstall FreeBSD? I only figured it out when I read some posts in the FreeBSD forum.

Second, it's not clear how to set options globally. It's tedious to set the same options to every applicable packages. Again, I only figured it out from the forum.

Third, it's not straightforward to find the dependencies in the port tree. It's still possible to do that before you start building the application, but I hope there is some kind of script doing that to make it more convenient.

Though there are many open source applications, not all of them support FreeBSD. Some don't have full support. For example, Firefox on FreeBSD doesn't include some features such as sandbox. I cannot open that kind of websites because of it. FreeBSD provides a Linux Compatible Layer so that we can run Linux applications on top of it. It, however, may be quite tricky to configure for some specific applications. I used Obsidian. It doesn't run out of box on the Linux compatible layer. There are a few questions about how to run it, and nobody knew about that. Luckily a person on the forum shared how he/she did that. But that's already been a few month since I tried to use it.

The only thing that made me give up is the graphic card driver. It's unstable. I'm using an old card, but it occasionally crashes and I have the black screen. I have no idea how to recover that. I cannot even switch to the console.

I can see that it's improving during my usage. But in the end I decide to move on. There are some maintenance here and there. I think I don't have the leisure of time to handle that. At the same time I am thinking of buying a new laptop because it's more flexible in my current stage. I cannot use FreeBSD because it doesn't support the latest wifi.

Then I will use Linux again. I don't want to use Gentoo because I don't want to deal with fixing the dependencies conflicts when I update. What's more, I don't want to build from the source or configure too much myself. I think I'll use openSUSE and use most default settings. openSUSE is my first Linux distribution, and I like YaST.

401(k) Plans And IRA

We need money all the time, from young to old, from home to abroad. Income is a critical source of money. When we work, our paycheck is the income. Then what is our income when we're retired? My focus in this post is on the retirements in the US. If we earn enough credits before retirement, we can get Social Security. But there is a limit on how much we can get. What's worse, there is news that Social Security funds are going to run out. To supplement that, there are some options to consider: 401(k) Plans and IRAs (Individual Retirement Account). In this post, I'll show you the differences among common 401(k) Plan and IRAs, and what you should consider when you make contribution and withdrawal.

The idea about 401(k) Plan and IRAs is that you contribute while you're working. Once you are retired, you withdraw from them and those are your income. You usually make investments in the 401(k) Plan and IRAs. The earnings of those investments are yours too. The more you contribute, and the more the earnings are, the more you have when you're retired. There is a risk on the investment you make in the account. If you lose money in your investments, you'll get less too. There are always one risk or another no matter how you plan your retirement.

Differences Overview

The 401(k) Plan is sponsored by an employer. That means it's the company you work for to open and administrate the plan. On the other hand, IRA is opened by you. You can have both. That is not the only difference. From tax perspective, there can be pre-tax, Roth, and after-tax. I'll compare IRAs and 401(k) in most common categories. Common IRAs include Traditional IRA and Roth IRA. Depending the source of the contribution, 401(k)'s contribution can be pre-tax, Roth, and after-tax. They can be inside the same plan.

CategoryTraditional IRARoth IRAPre-tax 401(k)Roth 401(k)After-tax 401(k)
Tax on contributionYes, maybe deductibleYes but NOT deductibleNoYesYes
Deadline to contributeTax return filing deadline (not including extensions)Tax return filing deadline (not including extensions)The calendar year endThe calendar year endThe calendar year end
Tax on qualified withdrawalYesNoYesNoYes on the earnings. No on the contribution.
Investment selectionsManyManyDepend on planDepend on planDepend on plan
Who can participateAnyoneAnyoneEmployer sponsoredDepend on planDepend on plan
Contribution limitYesYesYesYesYes
Required minimum distributionsYesNo as long as the owner is aliveYesYesYes
LoansNoNoDepend on planDepend on planDepend on plan
5-year holding period for qualified withdrawalN/ABegins January 1 of the year a contribution is made to any Roth IRAN/ASeparate for each Roth account and begins on January 1 of the year contributions made to that account. If one Roth account is rolled into another, the earlier start date applies.N/A
BeneficiaryAnyoneAnyoneAnyone but, if married, spouse must consent to non-spouse beneficiaryAnyone but, if married, spouse must consent to non-spouse beneficiaryAnyone but, if married, spouse must consent to non-spouse beneficiary

A Typical Example

The above is a quite high level overview. It may be difficult to understand how that relates to you and impacts your retirement plan. Tax is very important. Here is an example what happens in a typical and qualified scenario for each of the account.

Let's say you contribute $10K. Your balance in the account grows to $25K when you're retired and you withdraw $25K. There is $10K from the initial contribution, and $15K from the earnings of your investment. There are $10K contribution, $15K earnings, and $25K withdrawal.

When you do that in the Traditional IRA. The $10K is from your after-tax income. You may be able to deduct that from your tax return on the year you make the contribution. You should check deduction limit. That matters when you withdraw. When you withdrawal, you must pay the tax on the earnings portion which is $15K. As to the contribution portion, which is $10K, you only need to pay the tax on the amount that's deducted.

Now if you do that in the Roth IRA. That $10K is from your after-tax income. The downside is you cannot deduct that in your tax return. The upside is you don't need to pay tax when you withdraw those $25K from the account. Both the earnings ($15K) and the initial contribution ($10K) portions are not taxed.

In the case of 401(k), if you choose pre-tax (most case), That $10K is from your pre-tax income. That means that $10K isn't included when you calculate the tax you need to pay. But when you withdraw, both the earnings ($15K) and the initial contribution ($10K) portions will be taxed.

If you choose to make the Roth contribution in your 401(k), it's the same as Roth IRA. That $10K is from your after-tax income. You don't need to pay any tax on the earnings and initial contribution when you withdraw.

If you choose to make after tax contribution in your 401(k), same as Roth contribution, that $10K is from your after-tax income. You need to pay tax on the earnings portion ($15K) but you don't need to pay tax on the initial contribution portion ($10K).

What Happen in Withdrawal

It seems relative simple from the above examples. It's quite straightforward on the tax when you make the contribution. There are more to navigate when you need to withdraw. The examples above are for the qualified withdrawal. You need to pay extra attentions when they're not qualified, because you not only need to pay the tax on the withdrawal at your tax bracket, but also may need to pay additional 10% penalty tax.

Qualified Withdrawal

The details may be different in different accounts and be adjusted in future. You should check the IRS websites or other resources to get a complete list.

For the traditional IRA and pre-tax 401(k), you need to be at least 59.5 years old.

If it's Roth IRA, you need to have your account open for more than 5 years. In additional to that, you need to meet one of the criteria:

  1. You're 59.5 years old when you withdraw.
  2. You're permanently disabled.
  3. You inherit the account and take the money out.
  4. You take up to $10,000 as the first time home buyer.

If it's Roth 401(k), you need to have your Roth portion set up for more than 5 years, and you need to meet one of the criteria:

  1. You're 59.5 years old.
  2. You're permanently disabled.
  3. You inherit the account and take the money out.

Early Withdrawal

If you withdraw before you're 59.5 years old or is not qualified, you're doing early withdrawal. You need to pay the income tax on partial or whole of your withdrawal and pay additional 10% tax as the penalty. The penalty tax is only applied to the taxable portion of your non-qualified distributions.

For the pre-tax 401(k), you need to pay your regular income tax and the penalty on all your withdrawal.

For the traditional IRA, you need to pay your regular income tax on all your withdrawal and the penalty on the earnings and the contribution portion if it's deductible.

For Roth 401(k) and Roth IRA, your contribution portion will be tax free and penalty free. But the earnings portion is subject to regular income tax and penalty.

For after-tax 401(k), I don't find too much data about that. Assuming the same principal still holds, which is you only need to pay tax once, It'll be similar to Roth 401(k). That is you only need to pay the regular tax and penalty on the earnings portion.

Early Withdrawal Penalty Exceptions

But as how complicate the rules are, there are exceptions to the penalty. The rules are of course different according to the accounts.

Traditional IRA

  1. You're permanently disabled.
  2. You need to cover medical expenses when it exceeds a certain amount of your adjusted gross income.
  3. You need to cover qualified medical insurance premium during unemployment.
  4. You need to cover qualified higher education expense.
  5. You buy, build, or rebuild the first home.
  6. You inherit it and withdraw funds as beneficiary.
  7. You take a qualified reservist distribution - a distribution from a retirement account to a military reservist or member of National Guard called to active duty.
  8. You have a new baby.

Roth IRA

  1. You reach 59.5 years old.
  2. You're permanently disabled.
  3. You need to cover medical expenses when it exceeds a certain amount of your adjusted gross income.
  4. You need to cover qualified medical insurance premium during unemployment.
  5. You need to cover qualified higher education expense.
  6. You buy, build, or rebuild the first home.
  7. You inherit it and withdraw funds as beneficiary.
  8. You take a qualified reservist distribution - a distribution from a retirement account to a military reservist or member of National Guard called to active duty.
  9. It's due to IRS levy of the qualified plan.

401(K)

  1. You reach 59.5 years old when you leave your job.
  2. You're permanently disabled.
  3. You need to cover medical expenses when it exceeds a certain amount of your adjusted gross income.
  4. You need to cover qualified medical insurance premium during unemployment.
  5. You inherit it and withdraw funds as beneficiary.
  6. There is an immediate and heavy financial need.
  7. You take a qualified reservist distribution - a distribution from a retirement account to a military reservist or member of National Guard called to active duty.
  8. It's due to IRS levy of the plan.

Alternatives to Early Withdrawal

Some 401(K) plan allows borrowing from it. When you take the loan, you need to pay the principal and the interest. There are two benefits though

  1. Unlike early withdrawal, you don't need to pay the income tax or the penalty.
  2. Unlike taking personal loan, the interest you pay goes back to your 401(K) account, adding to its balance.

What you lose here maybe the potential growth of your investment in your 401(K) if you didn't take a loan. The loan is counted in dollars. The growth of your 401(K) depends on the shares of your investment. So if that investment keep going up, when you pay back your loan, you'll have less shares in your investment comparing to the case if you didn't take the loan.

This is intend to be an overview of what common retirement accounts are and what you need to know when you contribute and withdraw. I encourage you to review them with a professional such as an accountant, or read the articles in IRS website. There are much more details and potentially changes at each year.

Mlterm Configuration

mlterm is a lightweight and fast terminal. You can have your own configuration and customize it as you like.

I like mlterm because it can:

  1. Display texts in non-English locales and supports input methods.
  2. Has less dependencies. Unlike Konsole or Gnome-terminal, you don't need to install the extra packages when you're not using those desktop environments.
  3. lsix to view pictures inside the terminal.

Configurations

There are two ways to configure mlterm.

First, use the GUI configuration.
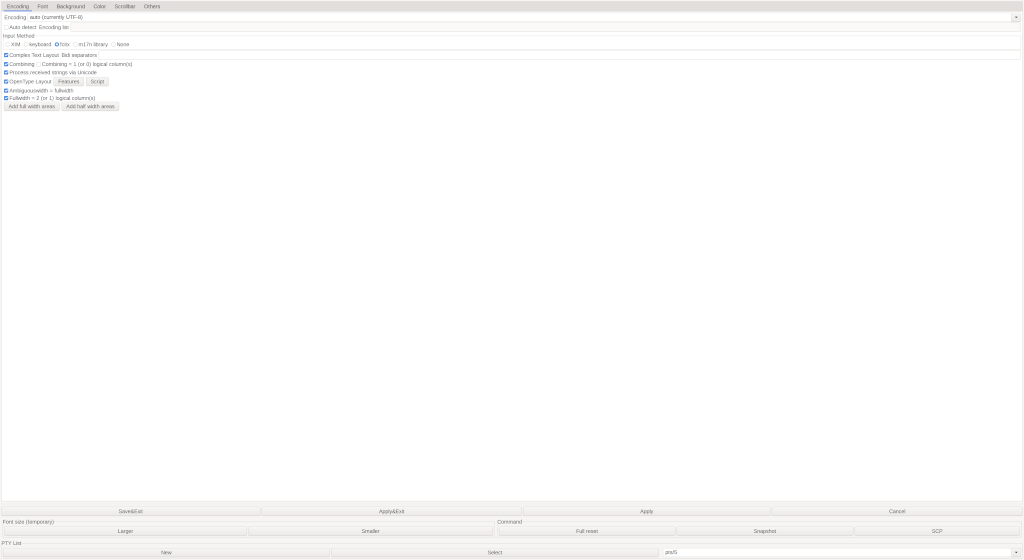
mlterm GUI configuration

What you need to do is to use Control + Right Click on the mlterm window to open the GUI configuration. You can make the change, apply it, and view the change. Remember to save it so that you don't lose the changes when you open mlterm later. I found it doesn't save some settings. I have to modify the configuration files.

The second way to configure mlterm is to modify the files. The configurations are in the folder $HOME/.mlterm. There are a few files.The ones I'll make changes are in main, key, and aafont. The main configuration file contains settings for mlterm in general. The key configuration file contains the key bindings. The aafont configuration file contains the font settings when you use anti-alias fonts.

Use Multiple Languages

My locale is UTF-8 and mlterm can detect it automatically. So I don't touch encoding related settings. I do change the settings for fonts and input method.

  1. Set use_aafont to true in the main configuration. Its default values is true if you run it on a desktop environment. It's false in mlterm-fb. So this is optional if you only use mlterm on a desktop environment. I explicitly set it to true in case I run mlterm-fb.
  2. Choose the font for the corresponding encodings. you can choose fonts for different encodings. Since my locale is UTF-8, I set it for the UNICODE one. In the aafont configuration file. you need to put something like this:
    UNICODE = Noto Sans Mono CJK SC 20
  3. Enable anti alias. You need to choose the font type that supports this feature. This is the setting use_anti_alias in main configuration file.
  4. Choose the input method. This is the setting input_method in the main configuration file. For example
    input_method = fcitx

Copy And Paste

It's better to understand selection on X11 before configure copy and paste. Anything you want to transfer from application to application is stored in selection. There are PRIMARY and CLIPBOARD as the destination of the selection. Anything you select or highlight will go to PRIMARY automatically. It's easy do it. You just need to use the mouse to select the text and that will go to PRIMARY. Once you select different texts, the new texts will overwrite the old ones in PRIMARY. To paste from PRIMARY, you can click the middle button or use SHIFT + INSERT. Mlterm supports it out of box. CLIPBOARD maybe is what most of us are familiar with. You copy by using Control + C and paste by Control + V. It's different from PRIMARY in that a new selection doesn't overwrite the contents in CLIPBOARD. You have to repeat the copy to clipboard action to update CLIPBOARD. I am familar with CLIPBOARD's way of copy and paste, so I configure mlterm to use it.

Copy to CLIPBOARD

There is a setting to copy the selection to both PRIMARY and CLIBOARD. It's the setting use_clipboard=true in the main configuration file. Its default value is true so the setting is optional. But if you would like to separate them, as I do, you need to set use_clipboard=false to copy the selection to only PRIMARY. Then create a key binding to copy it to CLIPBOARD

Control+Shift+c="exesel:copy_to_clip"

exesel runs a command on the selected text. copy_to_clip is a script I create. Remember to put it in the folder that can be found from PATH.
Here is what the script copy_to_clip does:

echo $@ | xsel -i --clipboard

mlterm passes the selected text to the command copy_to_clip. What that does is to echo it to the ouput and pipe it to xsel. xsel takes the input from the pipe (-i) and copies it to CLIPBOARD (--clipboard).

Paste from CLIPBOARD

To paste from the clipboard, I configure the key bindings. The key bindings are defined in the key configuration file. The format is key=feature. The mlterm man page lists what keys can be used and what features are supported. To paste from CLIPBOARD, I use the feature proto:paste clipboard. I bind it to both right click and CTRL +SHIFT +V. The binding are

Control+Shift+v="proto:paste clipboard"
Button3="proto:paste clipboard"

There is another feature INSERT_CLIPBOARD that allows you to paste from the clipboard. But you can only assign one key binding to it. But you can have multiple bindings to the proto features. That is why I use it and bind to both Control+Shift+v and Button3.

Use lsix

Since I mentioned lsix on mlterm, I would like to add to that there is an issue with it. The pictures are not displayed at the right place on mlterm. The good news is that lsix knows about that and has a fix for that. However, it only applies the fix when it detects that the terminal is mlterm. It checks the terminal type. But mlterm reports it's xterm. To fix that, I put termtype=mlterm in the main configuration file. You can also pass it in the argument (--term=mlterm) when you starts mlterm. That tells mlterm to report itself as mlterm and lsix can apply the fix. With this change, lsix will display the pictures at the right place.
Display images using lsix

Use DisplayLink in Gentoo

I've been using Gentoo on my desktop for over five years. The computer connects to a 1080p monitor. Recently I use a DisplayLink 6xxx dock station to connect to a 4k monitor.

Current Configurations

I don't have any plans to replace the computrt. The only option is to make it work with my current configurations.

  1. The graphic card can only support 1080p.
  2. I have two monitors. One is 1080p, the other 4k.
  3. I have a Dell Universal Dock - D6000. It's using DisplayLink and can support 4K monitors.
  4. I'm using i3wm. There aren't any display managers. Instead, I start x11 when I login on console. Only i3wm is used.

Given the existing configurations, I decide to connect to the 1080p monitor from the graphic card, and connect to the 4k monitor as a second monitor via the dock.

Install the Driver

I follow Gentoo DisplayLink wiki to set up the kernel. The wiki however looks outdated in general.

The only official driver for Linux is for Ubuntu. This article suggests to adapt the script to port the driver to other distributions. It's easier said than done. There is an overlay zyrenth that has ebuilds for displaylink-driver and evdi packages. The ebuilds are solid. But there are some issues with evdi and displaylink manager themselves.

  1. evdi version 17.0 fails to compile with kernel 5.10. https://github.com/DisplayLink/evdi/issues/254. It's fixed in later versions.
  2. evdi version 19.0 is not compatible to Display Manager 5.3.1, which is the version from the displaylink-driver ebuild. https://github.com/DisplayLink/evdi/issues/245

The only viable option is the evdi version 17.2. It's not provided in the overlay zyrenth. But build on top of others' work, I'm able to create my own ebuild. I follow the wiki custom ebuild repository to create a local repository. How to create a 17.2 ebuild? Just copy the 17.0 from overlay zyrenth and rename it 17.2. Then I have the ebuild for evdi version 17.2 and install it.

Configure HiDPI

The 4k monitor's maximium resolution is 3840 × 2160. Everything seems quite small on it. It's unpleasant to use. We need to conifure it for HiDPI. According to HiDPI document, I make this changes.

  1. Pass --dpi 196 when using xrandr.
  2. Set the xft.dpi: 196 in .Xresource and merge it with xrdb.
  3. Set the scaling factor for Gnome environment.
    gsettings set org.gnome.desktop.interface scaling-factor 2
    gsettings set org.gnome.desktop.interface text-scaling-factor 2
  4. Set the scaling factor for Qt.
      export QT_FONT_DPI=196
      export QT_SCALE_FACTOR=2
  5. Set the scaling factor for GTK based applications.
    export GDK_DPI_SCALE=2

I don't use Gnome or KDE and haven't verified how the settings for Gnome and Qt work. It seems xft.dpi setting makes the status bar in my i3wm larger and nicerr. But it doesn't make Firefox or Thunderbird or other GTK based appliations more legible. I have to use GDK_DPI_SCALE.

Probably it's because of my own configuration, I spend quite a while setting the HiDPI. I haven't tried other desktop environments. While I'm searching online, I feel like some desktop environment has the configuration from the GUI. That may make it easier for those desktop environments.

Connect to the Second Monitor

The second monitor is connected via the dock. The monitor capability in the dock isn't hotplug-able. So it's important to connect it to the computer when the system boots. After that, we can disconnect and re-connect the dock and we still can use the second monitor.

There are some extra work to connect to the second monitor. It's needed only one time when x11 starts.

  1. The displaylink-driver installs a dlm systemd service. The service has to be started after x11 starts. Since I start x11 from the console, I have to run systemctl start dlm once i3wm starts.
  2. I have to run xrandr --dpi 196 --output DVI-I-1-1 --mode 3840x2160 --rate 60 --right-of VGA-0 once after i3wm starts.

After running that, the second monitor is ready. I can disconnect and re-connect the dock at any time.

There are some research involved. It's not too difficult to find them. But overall, there are documents I can borrow to set up the DisplayLink for Gentoo.